Unlocking Java's Power with JNI: A Comprehensive Guide
- published
- reading time
- 14 minutes
Introduction:
Java Native Interface (JNI) is a powerful tool that allows Java code running in the Java Virtual Machine (JVM) to interact with code and libraries written in other languages, such as C and C++. JNI opens up a world of possibilities for Java developers, enabling them to access native code, leverage platform-specific features, and optimize performance. In this guide, we’ll delve into the world of JNI, exploring its benefits, how it works, and how you can start using it in your Java projects. JNI allows developers to create native methods for scenarios where an application cannot be fully developed using the Java programming language, such as when platform-specific features or program libraries are not supported by the standard Java class library.
What is JNI?
- JNI stands for Java Native Interface. It’s a framework that provides a way for Java code running in the JVM to call and be called by native applications and libraries written in other languages.
- JNI acts as a bridge between the platform-independent Java code and platform-specific native code.
The following diagram shows how the JNI ties the C side of an application to the Java side.
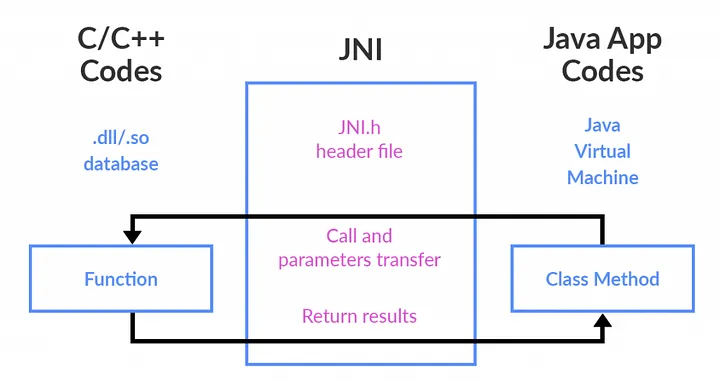
Figure 1: JNI Diagram sourced from Anshul Saraf’s Medium
Why use JNI?
We are all familiar with Java’s promise of platform-independence write once, run anywhere. Yet, this convenience often comes at the expense of raw performance when compared to native code. Java is known for its portability and ease of development, but there are times when performance becomes a critical issue, especially for computationally intensive tasks or when interacting with native system resources. This is where the Java Native Interface (JNI) comes into play. JNI allows Java developers to tap into the power of C/C++ code, offering a potential solution to performance bottlenecks that pure Java might encounter.
How JNI Works:
- JNI involves creating a bridge between Java and native code through a set of conventions and APIs.
- Key components include the Java Native Method Interface, Native Method Libraries, and the Java Virtual Machine.
- The developer writes native code in C or C++, compiles it into a shared library, and then loads this library from Java code.
Setting Up the Environment (Linux):
To develop and run JNI applications, you’ll need:
- Install Java Development Kit (JDK):
$ sudo apt-get update
$ sudo apt-get install openjdk-17-jdk
- Install a C/C++ Compiler:
$ sudo apt install build-essential
- Set Java Environment Variables:
$ export JAVA_HOME=/usr/lib/jvm/java-17-openjdk-amd64
$ export PATH=$PATH:$JAVA_HOME/bin
$ source ~/.bashrc  # or source ~/.bash_profile
Steps to Use JNI:
Step 1: Write the Java Code
Let’s start by creating a simple Java program that calculates the square root of a number using JNI.
// SquareRoot.java
public class SquareRoot {
    // Static block is executed when the class is loaded.
    // Here we load a native library named "SquareRoot".
    static {
        System.loadLibrary("SquareRoot");
    }

    // Native method declaration. The implementation is in native C/C++ code.
    // This method takes a double parameter and returns a double.
    public native double calculateSquareRoot(double number);

    public static void main(String[] args) {
        // Create an instance of SquareRoot.
        SquareRoot root = new SquareRoot();

        // Define the number for which we want to calculate the square root.
        double number = 25;

        // Call the native method calculateSquareRoot with the number as argument.
        // The native code computes the square root and returns the result.
        double result = root.calculateSquareRoot(number);

        // Print the result to the console.
        System.out.println("Square root of " + number + " is: " + result);
    }
}
When we write SquareRoot root = new SquareRoot();, we are creating a new instance of the SquareRoot class. This instance provides a context in which the calculateSquareRoot method can be called. After creating the root instance, we can then call the calculateSquareRoot method on this instance to perform the square root calculation on a specific number.
Step 2: Compile the Java Code
Compile the SquareRoot.java file to generate the class file.
$ javac SquareRoot.java
Step 3: Create the Header (.h) File
Use the javah tool to create the header file (SquareRoot.h) containing the native method declaration.
$ javah -jni SquareRoot
Since Java 8, the javac command has a built-in option to generate header files for JNI and javah no longer exists in the your /usr/lib/jvm/java-xx-openjdk-amd64/bin folder. You can use the -h option with javac to achieve the same result as javah.
$ javac -h . SquareRoot.java
This will generate SquareRoot.h file:
/* DO NOT EDIT THIS FILE - it is machine generated */
#include <jni.h>
/* Header for class SquareRoot */

#ifndef _Included_SquareRoot
#define _Included_SquareRoot
#ifdef __cplusplus
extern "C" {
#endif
/*
 * Class:     SquareRoot
 * Method:    calculateSquareRoot
 * Signature: (D)D
 */
JNIEXPORT jdouble JNICALL Java_SquareRoot_calculateSquareRoot
  (JNIEnv *, jobject, jdouble);

#ifdef __cplusplus
}
#endif
#endif
Step 4: Write the Native Method Implementation
Now, create a C file (SquareRoot.c) to implement the native method.
// SquareRoot.c
#include <jni.h>
#include "SquareRoot.h"
#include <math.h>

JNIEXPORT jdouble JNICALL Java_SquareRoot_calculateSquareRoot(JNIEnv *env, jobject obj, jdouble number) {
    return sqrt(number);
}
Step 5: Create a Shared Library
Compile the SquareRoot.c file to create a shared library. Use gcc to compile the C code into a shared library. Replace ${JAVA_HOME} with the actual path to your Java installation directory.
$ export JAVA_HOME=/usr/lib/jvm/java-17-openjdk-amd64
$ gcc -shared -fpic -o libSquareRoot.so SquareRoot.c -I"$JAVA_HOME/include" -I"$JAVA_HOME/include/linux"
This will create libSquareRoot.so shared library.
Step 6: Run the Program
Now, let’s run the Java program using the java command. Make sure the shared library is in the library path.
$ java -Djava.library.path=. SquareRoot
Integrating Java and Native Programs
Integrating Java with native programs involves declaring native methods in Java and implementing them in native code (such as C or C++). This process allows Java applications to leverage the capabilities of native code when needed.
Declaring Native Methods in Java
When declaring a native method in Java, the native keyword is used with an empty method body. On the native side, you provide the implementation for this native method. It’s vital to ensure the native function matches the method signature declared in the Java header file. The javac -h . aids in generating native function prototypes that align with Java-side declarations. This tells the Java compiler that the method implementation will be provided by a native library at runtime. Here’s an example:
public class NativeExample {
    // Declare a native method to be implemented in native code
    public native void nativeMethod();
}
In this example, nativeMethod is a native method that does not have an implementation in Java. Instead, it will be implemented in a native library.
Implementing Native Methods in C
Once you’ve declared a native method in Java, you need to implement it in a native language such as C/C++. Here’s how you would implement the nativeMethod from the previous example:
Native C Implementation (NativeExample.c):
/*
NativeExample.c
*/

#include <jni.h>
#include "NativeExample.h"
#include <stdio.h>

JNIEXPORT void JNICALL Java_NativeExample_nativeMethod(JNIEnv *env, jobject obj) {
    printf("This is a native method implementation\n");
}
Let’s delve into a simple example to understand JNI’s basics. We’ll create a Calculator class in Java with a native method to perform basic arithmetic operations.
The Java Side:
First, we define our Calculator class with a native method add:
// Calculator.java
public class Calculator {
    static {
      System.loadLibrary("Calculator");
    }

    private native int add(int a, int b);

    public static void main(String[] args) {
        Calculator calculator = new Calculator();
        int result = calculator.add(5, 7);
        System.out.println("Result: " + result);
    }
}
Here, add is declared as private native int add(int a, int b);. The native keyword indicates that the method’s implementation is in another language, and the declaration ends with a semicolon as the Java file does not provide the native method’s implementation.
The Native Language Side:
- Compile Calculator.java:
$ javac Calculator.java
- Generate the JNI-style header file Calculator.h:
$ javac -h . Calculator.java
Now, let’s examine Calculator.h to see the generated function prototype for add:
JNIEXPORT jint JNICALL Java_Calculator_add(JNIEnv *, jobject, jint, jint);
The function signature in Calculator.h must match our native implementation in C. Remember to include JNIEXPORT and JNICALL for cross-platform compatibility.
JNI Method Declaration Syntax:
JNIEXPORT jint JNICALL Java_Calculator_add(JNIEnv *, jobject, jint, jint);
Let’s decode each part of this declaration:
-
JNIEXPORT: This is a macro that is used to indicate that the following function should be made available to Java code. It is typically defined to an appropriate compiler directive for exporting symbols from a shared library.
-
jint: This is the return type of the JNI method. In this case, it’s jint, which corresponds to Java’s int type.
-
JNICALL: Similar to JNIEXPORT, this is a macro used to declare the calling convention for the function. It ensures that the function is called correctly according to the platform’s requirements.
-
Java_Calculator_add: This is the name of the JNI function. It follows a specific naming convention:
- Java_: This is a prefix that indicates the function is a JNI function.
- Calculator: This is the name of the Java class.
- add: This is the name of the Java method within the Calculator class.
-
(JNIEnv *env, jobject obj, jint, jint): These are the parameters of the JNI method:
- JNIEnv *env: The JNIEnv pointer is a reference to the JNI environment. It provides access to JNI functions.
- jobject obj: This is a reference to the Java object on which the method is being called. In this case, it’s the Calculator object.
- jint: This is the first parameter of the add method in Java, of type int.
- jint: This is the second parameter of the add method in Java, also of type int.
Native Method Implementation:
Here’s a simple implementation of add in C:
#include <jni.h>
#include <stdio.h>
#include "Calculator.h"

JNIEXPORT jint JNICALL Java_Calculator_add(JNIEnv *env, jobject obj, jint a, jint b) {
    int result = a + b;
    printf("Adding %d + %d = %d\n", a, b, result);
    return result;
}
Compile the C code into a shared library:
$ gcc -shared -o libCalculator.so -fPIC Calculator.c -I"$JAVA_HOME/include" -I"$JAVA_HOME/include/linux"
Set the library path and run Calculator:
$ export LD_LIBRARY_PATH=.
$ java Calculator
Native Method Names
Native method names are concatenated from:
- Prefix Java_
- Fully qualified class name
- Underscore _ separator
- Method name
Graphically, this looks as follows:
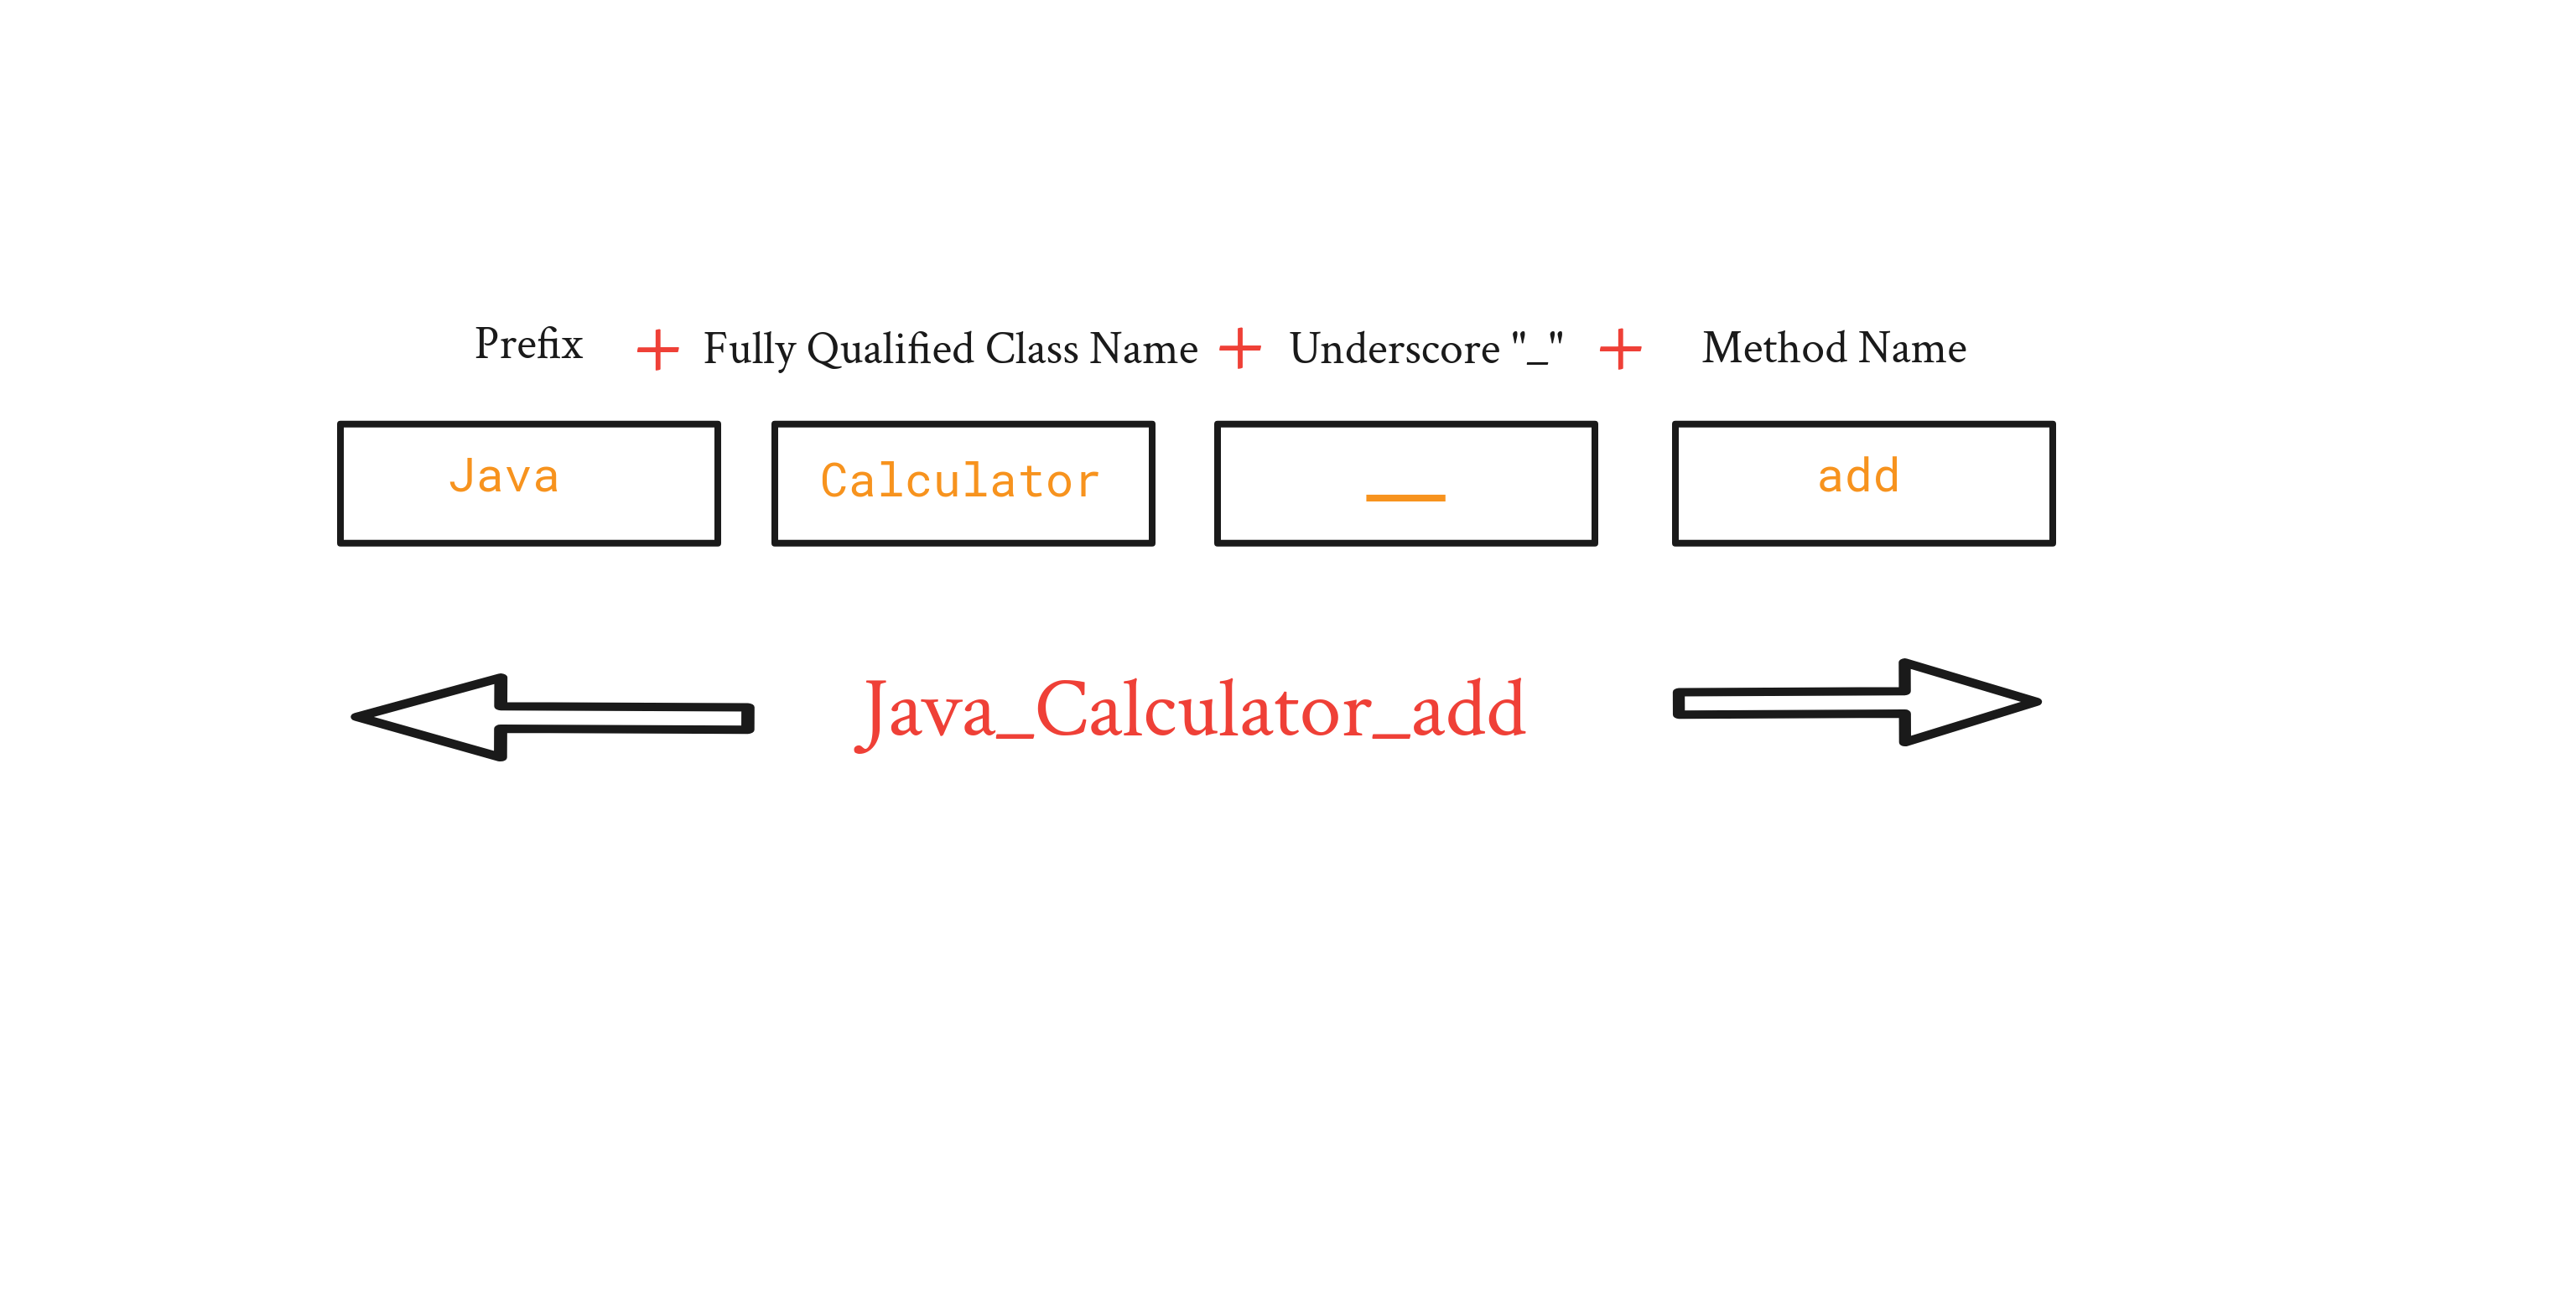
Thus, the native code implementation for the Calculator.add method becomes Java_Calculator_add
NOTE
Overloaded native method names, in addition to the above components, have an extra two underscores “__” appended to the method name followed by the argument signature.
Mapping Between Java and Native Types
JNI offers a mapping of Java types to native language (C/C++) types. This mapping covers both primitive Java types like int and double, and Java objects including strings and arrays. When a Java method with native code is called, its arguments are passed from the Java side to the native method. JNI provides ways to access these arguments in native code.
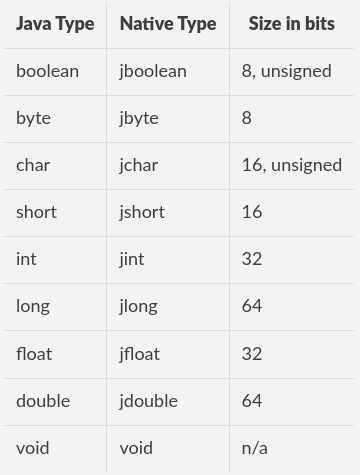
Java Primitive Types
When working with JNI, it’s crucial to understand how Java primitive types map to their native equivalents. JNI provides mappings to ensure seamless communication between Java and native code, allowing direct access to Java’s primitive types in native methods.
Mapping Table: Java Primitive Types to Native Types:
Java Object Types
In JNI, Java objects are passed by reference, and all references to Java objects have the type jobject. However, to facilitate working with different types of Java objects and avoid programming errors, JNI introduces a set of types that are conceptually all subclassed from (or are “subtypes” of) jobject. These types provide more specific representations for different kinds of Java objects.
Common JNI Object Types
Here are some commonly used JNI object types and their descriptions:
- jobject: Represents a reference to any Java object.
- jclass: Represents a reference to a Java class. This is used when working with Java class objects.
- jstring: Represents a reference to a Java String object.
- jarray: Represents a reference to a Java array object. There are subtypes such as:
- jbooleanArray: Represents a Java array of boolean values.
- jbyteArray: Represents a Java array of byte values.
- jcharArray: Represents a Java array of char values.
- jshortArray: Represents a Java array of short values.
- jintArray: Represents a Java array of int values.
- jlongArray: Represents a Java array of long values.
- jfloatArray: Represents a Java array of float values.
- jdoubleArray: Represents a Java array of double values.
- jobjectArray: Represents a reference to an array of Java objects. Each element in this array is of type jobject.
- jthrowable: Represents a reference to a Java exception (Throwable). This is used for exception handling in JNI.
In our Calculator.java example, the add native method accepts two Java int values as arguments and returns a Java int. The corresponding native implementation specifies jint for both the arguments and the return value.
JNIEXPORT jint JNICALL Java_Calculator_add(JNIEnv *, jobject, jint, jint);
Graphically, this looks as follows:
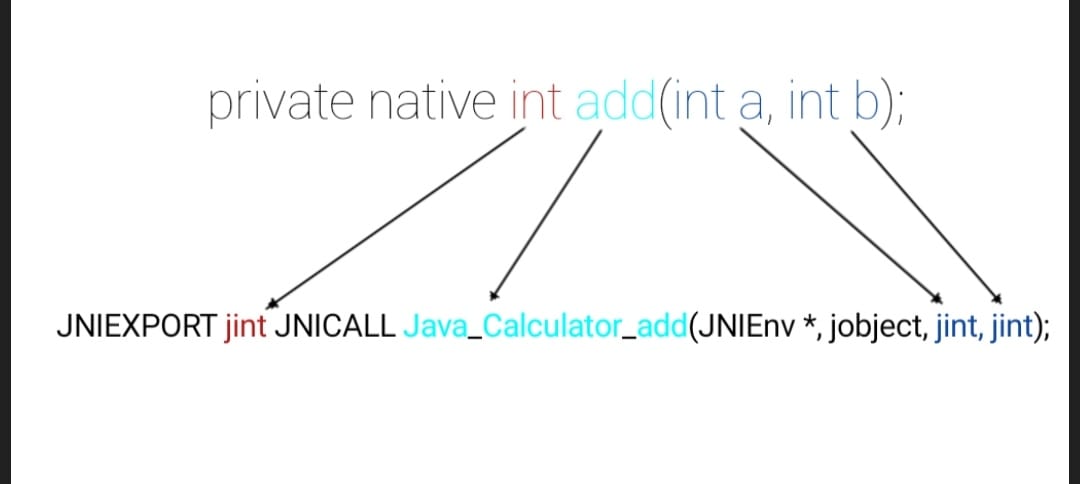
As mentioned above, jint corresponds to the Java type Int. Notice that the second argument to Java_Calculator_add, which is the reference to the object itself, has type jobject.
Exporting Strings from Java Native Interface (JNI)
We will revise the Naming Convention for JNI Functions:
In the JNI specification, the naming convention for JNI functions includes the fully qualified name of the Java class along with the method name. The format is:
JNIEXPORT <return_type> JNICALL Java_<fully_qualified_class_name>_<method_name>(JNIEnv *env, ...other_parameters...)
Here’s how the different parts of the JNI function name are constructed:
- JNIEXPORT: A macro indicating the calling convention and exporting of the function.
- <return_type>: The return type of the Java method.
- JNICALL: Another macro indicating the calling convention.
- Java_: A fixed prefix for JNI functions.
- <fully_qualified_class_name>: The fully qualified name of the Java class with underscores (_) replacing package separators (dots). For example, if your Java class is com.example.Main, it becomes com_example_Main.
- <method_name>: The name of the Java method.
In JNI, strings are represented by two main types:
- jstring: Represents a reference to a Java string (java.lang.String).
- const char*: Represents a null-terminated C string in native code.
Create a new file named HelloJNI.java with the following content:
public class HelloJNI {
    static {
        System.loadLibrary("HelloJNI"); // Load the native library
    }

    // Declare native method
    private native String getMessage();

    // Main method to test
    public static void main(String[] args) {
        HelloJNI hello = new HelloJNI();
        String message = hello.getMessage();
        System.out.println(message);
    }
}
To generate the JNI headers for HelloJNI.java, run the following command:
$ javac -h . HelloJNI.java
This will generate a header file named HelloJNI.h in the current directory.
Create a new file named HelloJNI.c with the following content:
#include <jni.h>
#include "HelloJNI.h" // Include the generated header

JNIEXPORT jstring JNICALL Java_HelloJNI_getMessage(JNIEnv *env, jobject obj) {
    return (*env)->NewStringUTF(env, "Hello from JNI!");
}
Compile the HelloJNI.c file into a shared library (libHelloJNI.so on Linux) using gcc. Make sure to include the JNI header files from your JDK installation:
$ gcc -shared -o libHelloJNI.so -I"$JAVA_HOME/include" -I"$JAVA_HOME/include/linux" HelloJNI.c
This completes the process of creating a simple JNI example. The Java class HelloJNI contains a native method getMessage() that is implemented in C to return the string “Hello from JNI!”. By following these steps, you’ve successfully integrated Java with native code using JNI.
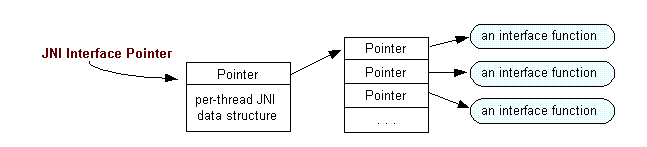
Why Use (*env) in JNI?
In JNI, native methods must access and manipulate Java objects through the JNIEnv interface pointer env. The env pointer is passed as the first parameter to JNI functions, indicating that we are calling those functions in the context of the current JNI environment. By using (*env)->FunctionName(…), we can access and manipulate Java objects (such as strings) safely and efficiently in native code. Proper use of env and JNI functions ensures correct handling of Java objects and prevents memory leaks.
The JNI Environment (accessed via the argument JNIEnv*) provides functions for the conversion:
- To get a C-string (char*) from JNI string (jstring), invoke method const char* GetStringUTFChars(JNIEnv*, jstring, jboolean*).
- To get a JNI string (jstring) from a C-string (char*), invoke method jstring NewStringUTF(JNIEnv*, char*).
String Reversal Example -
Now, let’s create a simple Java class that contains a native method for reversing a string:
// StringReversal.java

import java.util.Scannner;

public class StringReversal {
    static {
        System.loadLibrary("StringReversal"); // Load the native library
    }

    // Native method declaration to reverse a string
    public native String reverseString(String input);

    // Main method to test
    public static void main(String[] args) {
        StringReversal reversal = new StringReversal();
        Scanner scanner = new Scanner(System.in);
        System.out.println("Enter a string to reverse:");
        String input = scanner.nextLine();

        // Call the native method to reverse the input string
        String reversed = reversal.reverseString(input);
        System.out.println("Original: " + input);
        System.out.println("Reversed: " + reversed);

        scanner.close();
    }
}
Generate the JNI-style header file StringReversal.
$ javac -h . StringReversal.java
This command generates the StringReversal.h file in the current directory.
JNI Implementation for String Reversal -
Now, let’s implement the JNI side in C to reverse the string:
// StringReversal.c

#include <jni.h>
#include "StringReversal.h" // Include the generated header


JNIEXPORT jstring JNICALL Java_StringReversal_reverseString(JNIEnv *env, jobject obj, jstring input) {

  // Get UTF-8 chars from Java string
    const char *str = (*env)->GetStringUTFChars(env, input, NULL);
    if (str == NULL) {
        return NULL; // OutOfMemoryError already thrown by JNI
    }

  // Release the UTF-8 string obtained from GetStringUTFChars
    int length = (*env)->GetStringUTFLength(env, input);
    char reversed[length + 1]; // +1 for the null terminator
    for (int i = 0; i < length; i++) {
        reversed[i] = str[length - i - 1];
    }
    reversed[length] = '\0'; // Null-terminate the reversed string

    (*env)->ReleaseStringUTFChars(env, input, str);

  // Create a new Java string from the reversed C string
    return (*env)->NewStringUTF(env, reversed);
}
Native methods must access and manipulate Java objects, such as strings, through the env interface pointer. In C, this requires using the env pointer to reference the JNI function. Notice how the native method uses the env interface pointer to reference the two functions, GetStringUTFChars and ReleaseStringUTFChars, that it calls. Not only does the native method use env as an interface pointer, env is passed as the first parameter to these functions.
You can refer to the official Oracle documentation for Java JNI functions. Here is the link to the Oracle documentation for JNI functions:
Oracle JNI Functions Documentation